> ## Documentation Index
> Fetch the complete documentation index at: https://docs.mx.com/llms.txt
> Use this file to discover all available pages before exploring further.
# WebView
This guide covers embedding the Connect Widget in a native app via a WebView.
There may be other ways to do this, but we recommend the integrations discussed here; they are the most common approaches. We'll also go over some best practices.
**NOTE**
If you're embedding the Connect Widget in a webapp that is itself embedded in a WebView, see [Hybrid Mobile Webapps](#hybrid-mobile-webapps).
While working through this guide, it's also a good idea to follow along using the demos apps:
* [iOS demo](https://github.com/mxenabled/ios-connect-demo)
* [Android demo](https://github.com/mxenabled/android-connect-demo)
The first thing you'll need to do is request a widget URL. There are all sorts of ways to configure the Connect Widget using this endpoint, but with WebViews, it is particularly important to get the right options. You'll need to use `is_mobile_webview`, `ui_message_version`, and `client_redirect_url`.
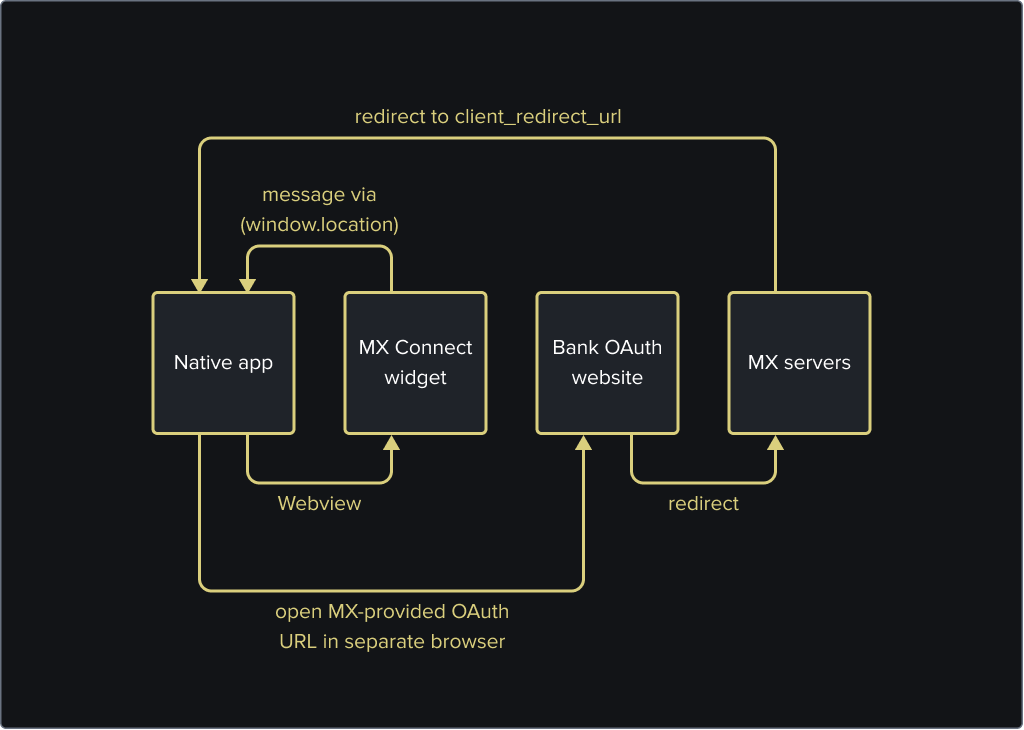
`is_mobile_webview` determines how the widget communicates. If set to `true` the widget will send messages via `window.location = '...'` instead of `window.postMessage(...)`.
`ui_message_version` ensures you get the [right messages](/connect/widget-events).
`client_redirect_url` allows you to define the URL that the user redirected to at the end of OAuth. This URL should be something your mobile app can respond to.
**INFO**
There are other less commonly used options that provide further customization to OAuth flows. For more info, see [Hybrid Mobile Apps](/connect/guides/webviews#hybrid-mobile-webapps).
```shell Request theme={null}
curl -i -X POST 'https://int-api.mx.com/users/USR-11141024-90b3-1bce-cac9-c06ced52ab4c/widget_urls' \
-u '{client_id}:{api_key}' \
-H 'Accept: application/vnd.mx.api.v1+json' \
-H 'Content-Type: application/json' \
-d '{
"widget_url": {
"widget_type": "connect_widget",
"is_mobile_webview": true,
"ui_message_version": 4,
"client_redirect_url": "{your_url_here}"
}
}'
```
```json Response theme={null}
{
"widget_url": {
"type": "connect_widget",
"url": "https://int-widgets.moneydesktop.com/md/connect/yxc...snip...Ay5",
"user_id": "u-abc-789"
}
}
```
WebViews bring some undesirable baggage for integrations, particularly:
* How does the widget 'talk' to my mobile app?
* What happens when the user tries to visit a link in the widget to an external site?
The answer to both of these questions is **navigation event**. Your native app will need to intercept **all** events and decide to either block the event (if that event is actually a message from the widget) or allow the event and send the user to the browser (like when a user is trying to visit a bank's site or trying to authenticate via OAuth).
For a good example of handling events, see the [iOS](https://github.com/mxenabled/ios-connect-demo/blob/main/ConnectDemo/ViewController.swift#L63) and [Android](https://github.com/mxenabled/android-connect-demo/blob/main/app/src/main/java/com/example/atriumconnectdemo/MXWebViewClient.java#L52-L102) demo apps.
**INFO**
Failure to appropriately handle navigation events in a WebView can lead to broken behavior, like replacing the Connect Widget with the bank's website with no way for the user to get back.
OAuth flows in WebViews will require you to facilitate the redirect to the OAuth provider, as well as let MX know how to get back to your native app.
To facilitate the redirect out, you will need to capture the [oauth requested message](/connect/widget-events#oauth-requested), get the URL from the payload, and send the user to that URL.
See a good example of handling OAuth in the [iOS](https://github.com/mxenabled/ios-connect-demo/blob/main/ConnectDemo/ViewController.swift#L138) or [Android](https://github.com/mxenabled/android-connect-demo/blob/main/app/src/main/java/com/example/atriumconnectdemo/MXWebViewClient.java#L77-L82) demo apps.
 **WARNING**
It's [required](https://datatracker.ietf.org/doc/html/rfc8252#section-8.12) to use the device's browser, not another WebView or iframe, to authenticate the user. Not only does this approach result in better security, it also can leverage saved passwords and password managers that the user has installed. It is also worth noting that many OAuth providers explicitly block loading their web apps in an iframe or webview.
**INFO**
The URL given in the payload will always be an MX URL; the user will be routed to us first, then to the provider.
**Example WebView Message**
```
mx://connect/oauthRequested?metadata={...JSON encoded payload ...}
```
**Example Redirect URL**
```
https://widgets.moneydesktop.com/oauth/predirect_to/MBR-f1e7a927-924f-4b31-a8da-61de02954d74/4wa...snip...02?referral_source=BROWSER&skip_aggregation=false&
```
To get back to your app, you'll want to make sure you set the `client_redirect_url` to a url that your app can respond to when linked from a browser. Once OAuth is complete, MX send the user to the `client_redirect_url` with some additional query parameters that have information on what happened.
**Example URL Back to Your App**
```
// client_redirect_url: "https://mx.com"
https://mx.com?status=success&member_guid=MBR-123
```
If the `status` field is `success`, you can simply continue showing the Connect Widget. It will continue as usual. A success message at this point means we were able to successfully get an OAuth token and have started a job. You'll want to let the Connect Widget finish doing its thing before moving on.
If the `status` field is `error`, you will want to close the widget and show a generic error view that is appropriate for your application. An error at this point can mean anything from a user rejecting OAuth terms to an internal server error. We are working on adding better error messaging, but for now, plan on making a generic error page to use as a catchall.
## Alternate redirect option
MX can also redirect to a custom URI scheme instead of a custom URL. If you use `ui_message_webview_url: "appscheme"`, for instance, The widget will redirect the user to that scheme with a path.
`ui_message_webview_url_scheme` also influences the scheme used in post messages when `is_mobile_webview: true` is used. You can see an example of that in the [iOS](https://github.com/mxenabled/ios-connect-demo/blob/main/ConnectDemo/ConnectController.swift#L68-L70) and [Android](https://github.com/mxenabled/android-connect-demo/blob/main/app/src/main/java/com/example/atriumconnectdemo/MXWebViewClient.java#L70) demo apps.
**Example URI Back to Your App**
```
// Demo app uses a `ui_message_webview_url_scheme: "appscheme"
appscheme://oauth_complete?status=success&member_guid=MBR-123
```
You'll want to make sure your app can respond to these schemes. See examples with the [iOS](https://github.com/mxenabled/ios-connect-demo/blob/main/ConnectDemo/Info.plist#L11-L20) and [Android](https://github.com/mxenabled/android-connect-demo/blob/main/app/src/main/AndroidManifest.xml#L21-L30) demo apps.
## Hybrid Mobile Webapps
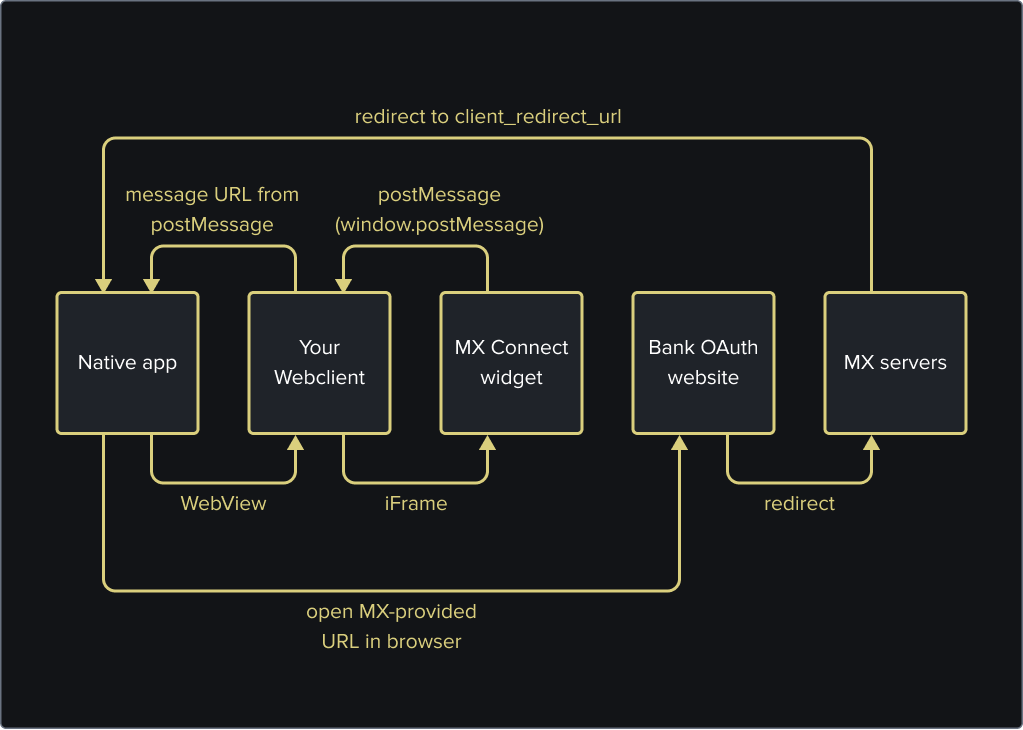
If you are embedding the Connect Widget in a webapp that is itself embedded in a WebView, there are some additional options for you.
The first change you may want to make `is_mobile_webview: false` (or omit entirely). This would allow your webapp and the Connect Widget to communicate via postMessages just like they would in a browser setting.
Then you would want to use `oauth_referral_source: "APP"`. This tells MX that you want us to redirect the user at the end of OAuth, instead of using postMessages in a browser.
**Example URL Request**
```shell theme={null}
curl -i -X POST 'https://int-api.mx.com/users/USR-11141024-90b3-1bce-cac9-c06ced52ab4c/widget_urls' \
-u '{client_id}:{api_key}' \
-H 'Accept: application/vnd.mx.api.v1+json' \
-H 'Content-Type: application/json' \
-d '{
"widget_url": {
"widget_type": "connect_widget",
"ui_message_version": 4,
"client_redirect_url": "{your_url_here}",
"oauth_referral_source": "APP"
}
}'
```
**Example URL Response**
```shell theme={null}
{
"widget_url": {
"type": "connect_widget",
"url": "https://int-widgets.moneydesktop.com/md/connect/yxc...snip...Ay5",
"user_id": "u-abc-789"
}
}
```
From here, you would still want to listen for the [OAuth requested postMessage](/connect/widget-events#oauth-requested) in your webapp, then message the URL to your mobile app, so it can redirect them via the mobile device's browser. Once OAuth is completed, MX will redirect the user back to your `client_redirect_url`.
**WARNING**
It's [required](https://datatracker.ietf.org/doc/html/rfc8252#section-8.12) to use the device's browser, not another WebView or iframe, to authenticate the user. Not only does this approach result in better security, it also can leverage saved passwords and password managers that the user has installed. It is also worth noting that many OAuth providers explicitly block loading their web apps in an iframe or webview.
**INFO**
The URL given in the payload will always be an MX URL; the user will be routed to us first, then to the provider.
**Example WebView Message**
```
mx://connect/oauthRequested?metadata={...JSON encoded payload ...}
```
**Example Redirect URL**
```
https://widgets.moneydesktop.com/oauth/predirect_to/MBR-f1e7a927-924f-4b31-a8da-61de02954d74/4wa...snip...02?referral_source=BROWSER&skip_aggregation=false&
```
To get back to your app, you'll want to make sure you set the `client_redirect_url` to a url that your app can respond to when linked from a browser. Once OAuth is complete, MX send the user to the `client_redirect_url` with some additional query parameters that have information on what happened.
**Example URL Back to Your App**
```
// client_redirect_url: "https://mx.com"
https://mx.com?status=success&member_guid=MBR-123
```
If the `status` field is `success`, you can simply continue showing the Connect Widget. It will continue as usual. A success message at this point means we were able to successfully get an OAuth token and have started a job. You'll want to let the Connect Widget finish doing its thing before moving on.
If the `status` field is `error`, you will want to close the widget and show a generic error view that is appropriate for your application. An error at this point can mean anything from a user rejecting OAuth terms to an internal server error. We are working on adding better error messaging, but for now, plan on making a generic error page to use as a catchall.
## Alternate redirect option
MX can also redirect to a custom URI scheme instead of a custom URL. If you use `ui_message_webview_url: "appscheme"`, for instance, The widget will redirect the user to that scheme with a path.
`ui_message_webview_url_scheme` also influences the scheme used in post messages when `is_mobile_webview: true` is used. You can see an example of that in the [iOS](https://github.com/mxenabled/ios-connect-demo/blob/main/ConnectDemo/ConnectController.swift#L68-L70) and [Android](https://github.com/mxenabled/android-connect-demo/blob/main/app/src/main/java/com/example/atriumconnectdemo/MXWebViewClient.java#L70) demo apps.
**Example URI Back to Your App**
```
// Demo app uses a `ui_message_webview_url_scheme: "appscheme"
appscheme://oauth_complete?status=success&member_guid=MBR-123
```
You'll want to make sure your app can respond to these schemes. See examples with the [iOS](https://github.com/mxenabled/ios-connect-demo/blob/main/ConnectDemo/Info.plist#L11-L20) and [Android](https://github.com/mxenabled/android-connect-demo/blob/main/app/src/main/AndroidManifest.xml#L21-L30) demo apps.
## Hybrid Mobile Webapps
If you are embedding the Connect Widget in a webapp that is itself embedded in a WebView, there are some additional options for you.
The first change you may want to make `is_mobile_webview: false` (or omit entirely). This would allow your webapp and the Connect Widget to communicate via postMessages just like they would in a browser setting.
Then you would want to use `oauth_referral_source: "APP"`. This tells MX that you want us to redirect the user at the end of OAuth, instead of using postMessages in a browser.
**Example URL Request**
```shell theme={null}
curl -i -X POST 'https://int-api.mx.com/users/USR-11141024-90b3-1bce-cac9-c06ced52ab4c/widget_urls' \
-u '{client_id}:{api_key}' \
-H 'Accept: application/vnd.mx.api.v1+json' \
-H 'Content-Type: application/json' \
-d '{
"widget_url": {
"widget_type": "connect_widget",
"ui_message_version": 4,
"client_redirect_url": "{your_url_here}",
"oauth_referral_source": "APP"
}
}'
```
**Example URL Response**
```shell theme={null}
{
"widget_url": {
"type": "connect_widget",
"url": "https://int-widgets.moneydesktop.com/md/connect/yxc...snip...Ay5",
"user_id": "u-abc-789"
}
}
```
From here, you would still want to listen for the [OAuth requested postMessage](/connect/widget-events#oauth-requested) in your webapp, then message the URL to your mobile app, so it can redirect them via the mobile device's browser. Once OAuth is completed, MX will redirect the user back to your `client_redirect_url`.