> ## Documentation Index
> Fetch the complete documentation index at: https://docs.mx.com/llms.txt
> Use this file to discover all available pages before exploring further.
# MDX On Demand v5
## On Demand is a Good Fit for...
Integrations where partners cannot support Real Time data creation (when users, accounts, or transactions are created, updated, or deleted in the partner's system) in the MX Platform. In this case, On Demand serves as the primary tool for creating accounts, transactions, and holdings in the MX Platform. Users and members must always be created with the Real Time API.
**INFO**
Read our [MDX On Demand API Reference](/api-reference/more-apis/mdx/mdx-on-demand/) for more information.
## Required APIs for an On Demand Integration
1. MDX Real Time - User and member creation
2. SSO API - User authentication and software access
3. MDX On Demand - Primary tool for aggregating accounts, transactions, and holdings
These three APIs ensure that users are created in the MX Platform (MDX Real Time), their accounts, transactions, and holdings are created (MDX On Demand), and users can be authenticated to load the widgets (SSO).
## Creating a User and Member
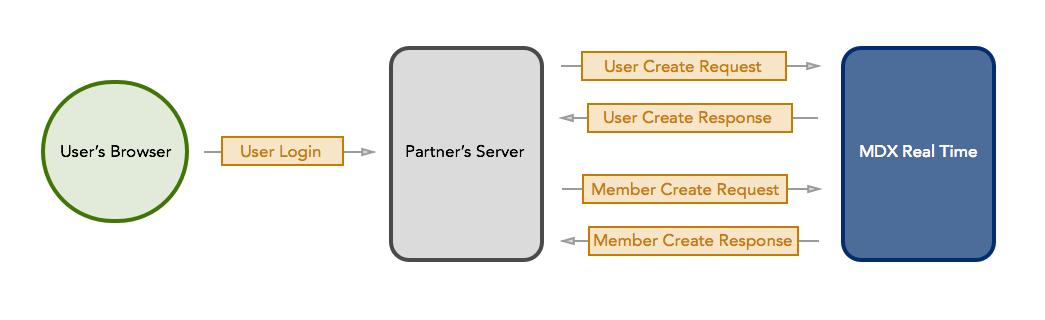 When a user clicks on the PFM link for the first time, a request is made to your server to create a new user. Your server then issues a [create user request](/api-reference/more-apis/mdx/mdx-real-time/reference/users/create-user) to Real Time. Real Time responds by creating a new user. Your server then makes a [create member request](/api-reference/more-apis/mdx/mdx-real-time/reference/members/create-member) to Real Time.
## Requesting a Widget URL
When a user clicks on the PFM link for the first time, a request is made to your server to create a new user. Your server then issues a [create user request](/api-reference/more-apis/mdx/mdx-real-time/reference/users/create-user) to Real Time. Real Time responds by creating a new user. Your server then makes a [create member request](/api-reference/more-apis/mdx/mdx-real-time/reference/members/create-member) to Real Time.
## Requesting a Widget URL
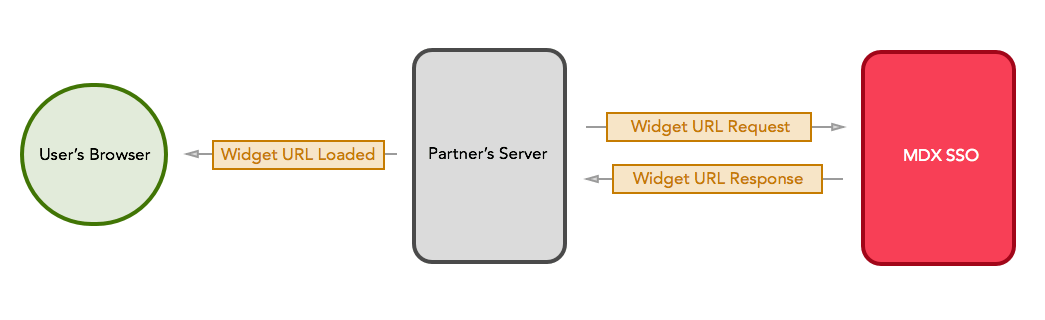 After the user and associated member(s) are created, you request a URL from the [MX SSO API](/api-reference/sso/v3/) to load the widget in the user's browser. MX responds with a widget URL, which you load into the user's browser. This loads MX's widget and is considered a log-in event.
## Requesting Accounts, Transactions, and Holdings
After the user and associated member(s) are created, you request a URL from the [MX SSO API](/api-reference/sso/v3/) to load the widget in the user's browser. MX responds with a widget URL, which you load into the user's browser. This loads MX's widget and is considered a log-in event.
## Requesting Accounts, Transactions, and Holdings
 **INFO**
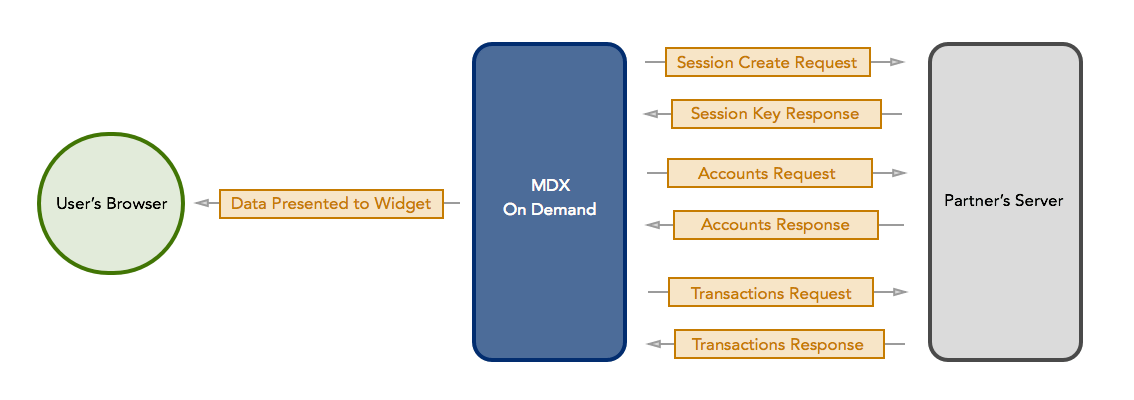
Holdings are optional and not shown in the diagram above. However, they follow the same pattern as transactions.
The log-in event causes MX to issue an On Demand request to your server to pull the user's accounts, transactions, and holdings. MX requests a session, and you respond with a session `key`. This key is used in every subsequent On Demand request.
MX requests the user's `accounts`. [You respond with the account information](/api-reference/more-apis/mdx/mdx-on-demand/reference/accounts/list-accounts).
MX requests `transactions` within a specific date range for each account. You respond with all [transactions for the account within the date range](/api-reference/more-apis/mdx/mdx-on-demand/reference/transactions/list-transactions).
If your account response included any accounts with `true`, MX requests `holdings` for those accounts. You respond with all [holdings for the account](/api-reference/more-apis/mdx/mdx-on-demand/reference/holdings/list-holdings).
All of the account, transaction, and holding data is presented to the user in the widget UI. This step is automatic and no further action is needed.
## Performance Testing
You can test your MDX On Demand service by simulating the calls made in a typical aggregation process from MX. This includes calculating MD5 and HMAC headers and making API calls in the proper order. We've provided a JMeter template for this purpose. This document explains how to set up and run these tests using JMeter.
Download release build binary from the [JMeter download site](http://jmeter.apache.org/download_jmeter.cgi) and follow the instructions for installation.
Download the `mx_jmeter.zip` packaged files [here](/assets/mx_jmeter.zip).
Included files are:
* `jruby-complete-1.7.9.jar`: this library is required to run the specific templates provided
* `ondemand_unamepass.jmx`: JMeter template for testing On Demand with Username and Password
* `ondemand_userkey.jmx`: JMeter template for testing On Demand with Userkey
1. Place the jruby library in the `/lib/` directory.
2. Place the `.jmx` template files in the `/bin/` directory.
The JMeter test templates require a list of user credentials to pass to the Sessions call. This list should be set up as a CSV file called `login.csv` and placed in the `/bin/` directory.
* For username/password credentials, use the format `username,password` with one record per line.
* For userkey credentials, use the format `userkey` with one record per line.
**INFO**
It is recommended to have enough sets of credentials to allow for simultaneous threads.
* Run JMeter executable in the `/bin/` directory from a command console.
* Load the `.jmx` template by going to File > Open and selecting the appropriate template for your credential type.
Click on the Test Plan in the template tree and fill out the User Defined Variables.
| `Name` | Definition | Example Value |
| ------- | ------------------------------------------------------------------------------------------------------------------------------------------------- | ---------------------------------------------- |
| `site` | The URL of your On Demand service excluding the protocol prefix. | `abcbankweb.com/mxondemand.api/abcbank` |
| `salt` | The SALT key in base64 format provided by MX for the HMAC calculation. Include double quotes. | "M2Z0NTg5cnR5dTc5NGFyNDExM2QyMjIzMDY5YTRmNGU=" |
| `sha` | The digest encryption algorithm used to calculate the HMAC. This will be provided when the SALT is generated. | 'sha1' |
| `days` | The number of days requested in each transactions request. For example, 90 days means each request covers transactions from today to 90 days ago. | 90 |
| `users` | The number of users in the `login.csv` file. | `1` |
**INFO**
All fields must be populated with correct values for the tests to work. This includes the `salt` and `sha` fields. If you do not have these, they can be provided by MX.
**INFO**
Holdings are optional and not shown in the diagram above. However, they follow the same pattern as transactions.
The log-in event causes MX to issue an On Demand request to your server to pull the user's accounts, transactions, and holdings. MX requests a session, and you respond with a session `key`. This key is used in every subsequent On Demand request.
MX requests the user's `accounts`. [You respond with the account information](/api-reference/more-apis/mdx/mdx-on-demand/reference/accounts/list-accounts).
MX requests `transactions` within a specific date range for each account. You respond with all [transactions for the account within the date range](/api-reference/more-apis/mdx/mdx-on-demand/reference/transactions/list-transactions).
If your account response included any accounts with `true`, MX requests `holdings` for those accounts. You respond with all [holdings for the account](/api-reference/more-apis/mdx/mdx-on-demand/reference/holdings/list-holdings).
All of the account, transaction, and holding data is presented to the user in the widget UI. This step is automatic and no further action is needed.
## Performance Testing
You can test your MDX On Demand service by simulating the calls made in a typical aggregation process from MX. This includes calculating MD5 and HMAC headers and making API calls in the proper order. We've provided a JMeter template for this purpose. This document explains how to set up and run these tests using JMeter.
Download release build binary from the [JMeter download site](http://jmeter.apache.org/download_jmeter.cgi) and follow the instructions for installation.
Download the `mx_jmeter.zip` packaged files [here](/assets/mx_jmeter.zip).
Included files are:
* `jruby-complete-1.7.9.jar`: this library is required to run the specific templates provided
* `ondemand_unamepass.jmx`: JMeter template for testing On Demand with Username and Password
* `ondemand_userkey.jmx`: JMeter template for testing On Demand with Userkey
1. Place the jruby library in the `/lib/` directory.
2. Place the `.jmx` template files in the `/bin/` directory.
The JMeter test templates require a list of user credentials to pass to the Sessions call. This list should be set up as a CSV file called `login.csv` and placed in the `/bin/` directory.
* For username/password credentials, use the format `username,password` with one record per line.
* For userkey credentials, use the format `userkey` with one record per line.
**INFO**
It is recommended to have enough sets of credentials to allow for simultaneous threads.
* Run JMeter executable in the `/bin/` directory from a command console.
* Load the `.jmx` template by going to File > Open and selecting the appropriate template for your credential type.
Click on the Test Plan in the template tree and fill out the User Defined Variables.
| `Name` | Definition | Example Value |
| ------- | ------------------------------------------------------------------------------------------------------------------------------------------------- | ---------------------------------------------- |
| `site` | The URL of your On Demand service excluding the protocol prefix. | `abcbankweb.com/mxondemand.api/abcbank` |
| `salt` | The SALT key in base64 format provided by MX for the HMAC calculation. Include double quotes. | "M2Z0NTg5cnR5dTc5NGFyNDExM2QyMjIzMDY5YTRmNGU=" |
| `sha` | The digest encryption algorithm used to calculate the HMAC. This will be provided when the SALT is generated. | 'sha1' |
| `days` | The number of days requested in each transactions request. For example, 90 days means each request covers transactions from today to 90 days ago. | 90 |
| `users` | The number of users in the `login.csv` file. | `1` |
**INFO**
All fields must be populated with correct values for the tests to work. This includes the `salt` and `sha` fields. If you do not have these, they can be provided by MX.
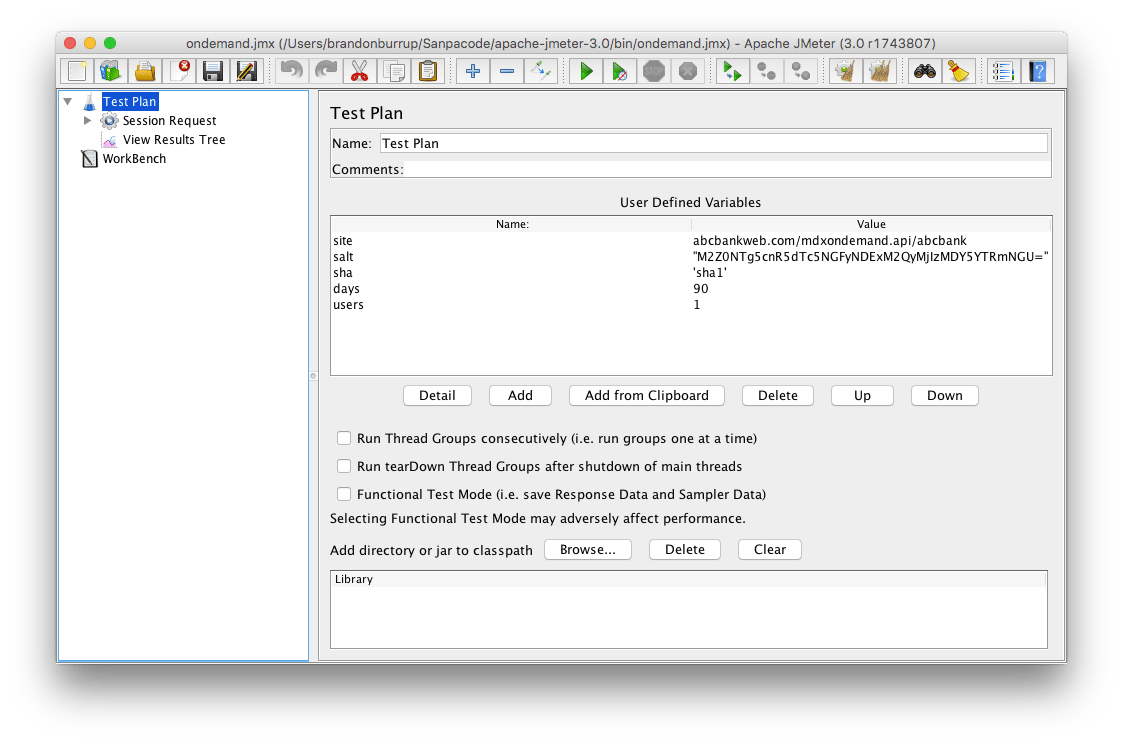 To test the user list multiple times, change the loop count by going to the top-level Session Request and modifying the "Loop Count" value. The default is 1.
Start the tests by clicking the green "play" button in the JMeter toolbar. Monitor the API requests and responses in the "View Results Tree" section.
To test the user list multiple times, change the loop count by going to the top-level Session Request and modifying the "Loop Count" value. The default is 1.
Start the tests by clicking the green "play" button in the JMeter toolbar. Monitor the API requests and responses in the "View Results Tree" section.