> ## Documentation Index
> Fetch the complete documentation index at: https://docs.mx.com/llms.txt
> Use this file to discover all available pages before exploring further.
# API Documentation
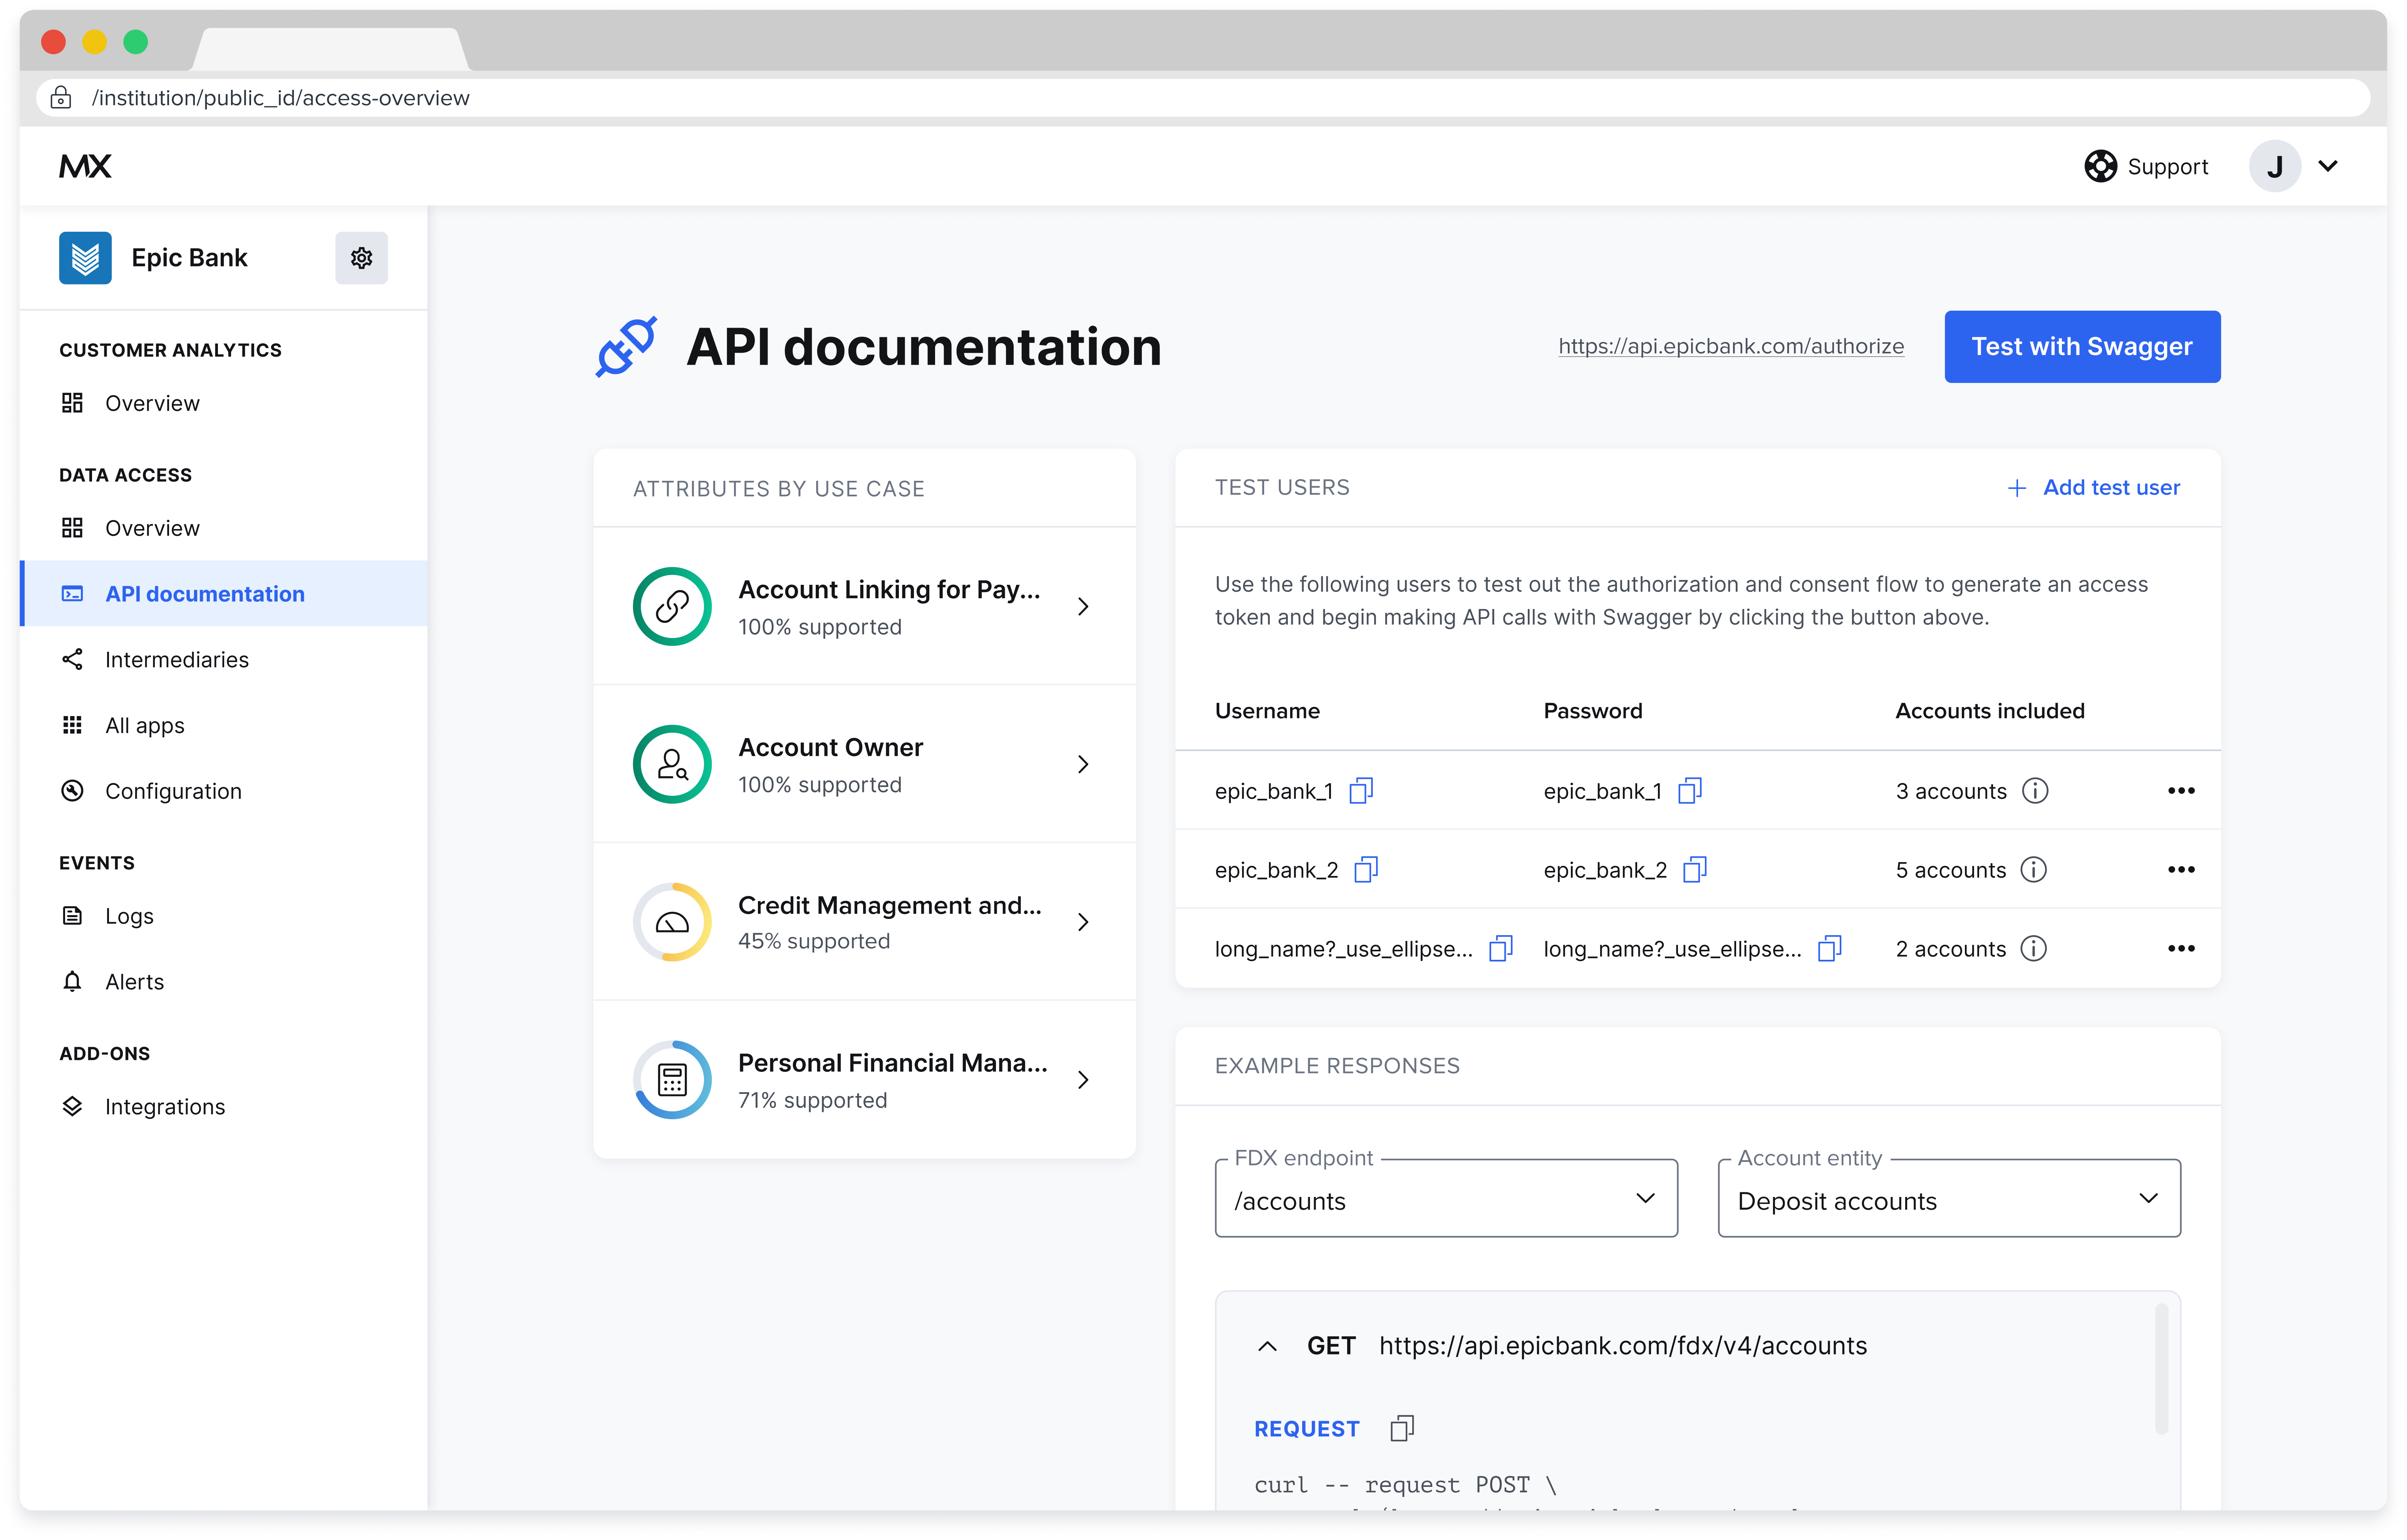
The API Documentation page provides an general view of and documentation for your API, including the following. These features can help you test your API and enable rapid onboarding of intermediaries and data recipients, who have access to a similar page within the [Data Recipient Portal](/products/data/data-access/data-recipient-reference/data-recipient-portal/).
* Available endpoints with example requests and responses.
* Attribute support for particular FDX use cases.
* A test environment.
* The ability to add and remove test users.
To navigate to the API Overview page, select API Documentation from the left-side navigation menu.
 ## View Supported Attributes by Use Case
In the Attributes by Use Case section, see a list of supported use cases. Each use case indicates the percentage of attributes that are supported to be FDX certified.
To view the attributes for a particular use case, select the use case. A page listing all available attributes appears. It provides a definition for each attribute, whether it's required by FDX, whether it's supported in your API, and its data type.
You'll also see an explanation of the use case and a list of endpoints associated with the use case.
To search for a particular attribute, select and then type in the search bar.
To filter by FDX requirements, select the **FDX requirement** dropdown.
To filter by support status, select the **API status** dropdown.
## Example Responses
To see example responses for the endpoints in your API, select one of the endpoints listed in the **Example responses** section. The dropdown will expand to show you an explanation of the endpoint and example response with a description of its contents.
## Add a Test User
Test users must exist on your systems before adding them as test users within Data Access.
## View Supported Attributes by Use Case
In the Attributes by Use Case section, see a list of supported use cases. Each use case indicates the percentage of attributes that are supported to be FDX certified.
To view the attributes for a particular use case, select the use case. A page listing all available attributes appears. It provides a definition for each attribute, whether it's required by FDX, whether it's supported in your API, and its data type.
You'll also see an explanation of the use case and a list of endpoints associated with the use case.
To search for a particular attribute, select and then type in the search bar.
To filter by FDX requirements, select the **FDX requirement** dropdown.
To filter by support status, select the **API status** dropdown.
## Example Responses
To see example responses for the endpoints in your API, select one of the endpoints listed in the **Example responses** section. The dropdown will expand to show you an explanation of the endpoint and example response with a description of its contents.
## Add a Test User
Test users must exist on your systems before adding them as test users within Data Access.
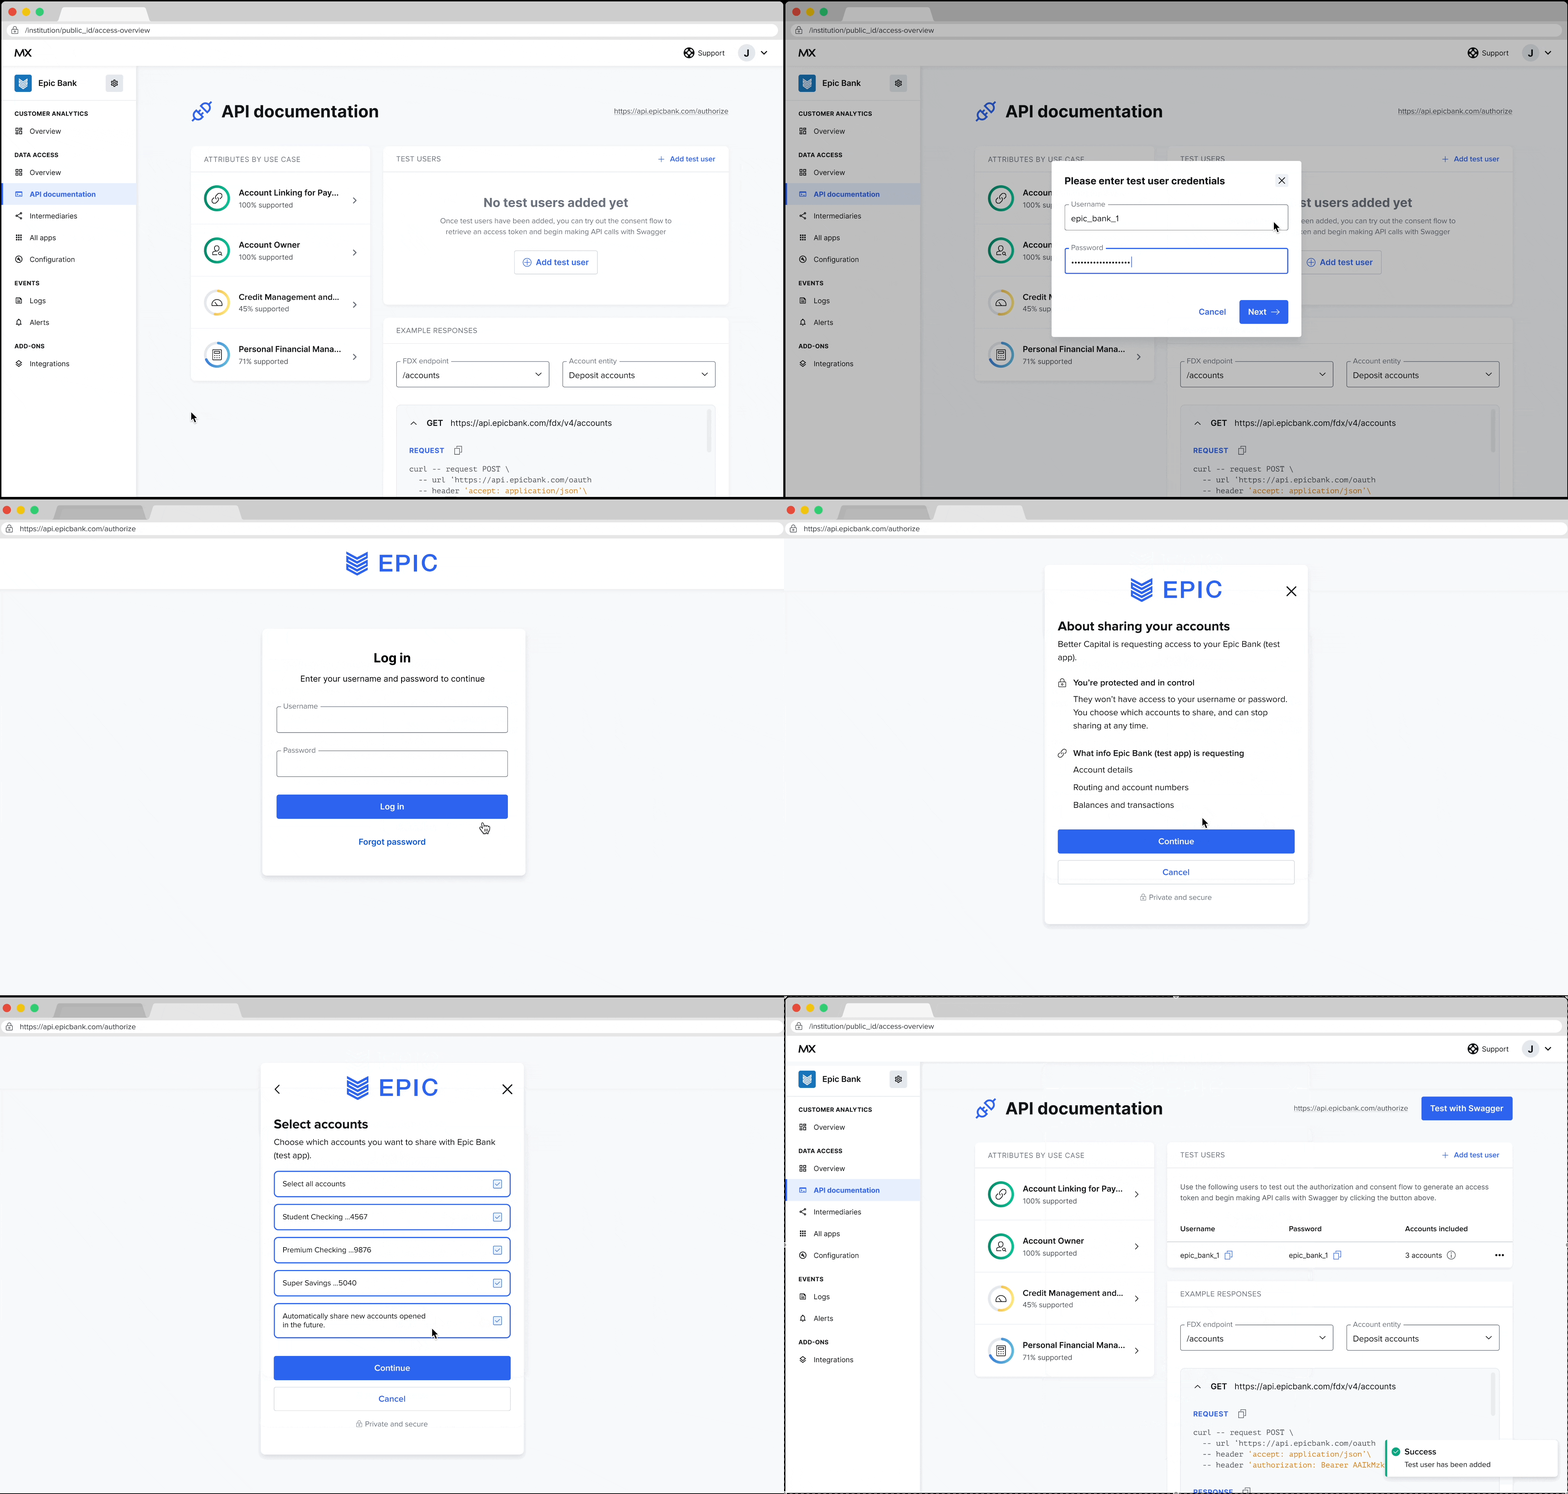 To add a test user:
1. Select **+ Add test user**. The add test user modal will appear.
2. Enter the username and password and select **Next**. A modal will appear explaining that you will be redirected to authenticate the test user and share the appropriate accounts.
3. Select **Continue**.
4. Authenticate with the username and password you used in step 2. You will be taken through the consent management flow for the test user.
5. Select **Continue**.
6. Check the **Select all accounts** box, then select **Continue**. You will see the **Review and share** modal.
7. Select **Confirm**.
Your new test user will appear in the test users section.
## Testing Your APIs
Our test environment uses the common Swagger frontend and allows you to test all endpoints available in your API with the test users you have provided.
Select **Test the APIs** on the API Overview page to display the testing page.
### Test an Endpoint
To test an endpoint:
1. Select a test user from the **Username** dropdown.
2. Select the endpoint from the list on the testing page. A dropdown will expand to display an explanation of the endpoint as well as all optional and required parameters
3. Select **Try it out**.
4. Provide all required parameters.
5. Provide any optional parameters that you require.
6. Select **Execute**. The response will appear under the execute button. It includes a curl example for the request, the request URL, and the response body.
### Modify Consent
To add a test user:
1. Select **+ Add test user**. The add test user modal will appear.
2. Enter the username and password and select **Next**. A modal will appear explaining that you will be redirected to authenticate the test user and share the appropriate accounts.
3. Select **Continue**.
4. Authenticate with the username and password you used in step 2. You will be taken through the consent management flow for the test user.
5. Select **Continue**.
6. Check the **Select all accounts** box, then select **Continue**. You will see the **Review and share** modal.
7. Select **Confirm**.
Your new test user will appear in the test users section.
## Testing Your APIs
Our test environment uses the common Swagger frontend and allows you to test all endpoints available in your API with the test users you have provided.
Select **Test the APIs** on the API Overview page to display the testing page.
### Test an Endpoint
To test an endpoint:
1. Select a test user from the **Username** dropdown.
2. Select the endpoint from the list on the testing page. A dropdown will expand to display an explanation of the endpoint as well as all optional and required parameters
3. Select **Try it out**.
4. Provide all required parameters.
5. Provide any optional parameters that you require.
6. Select **Execute**. The response will appear under the execute button. It includes a curl example for the request, the request URL, and the response body.
### Modify Consent
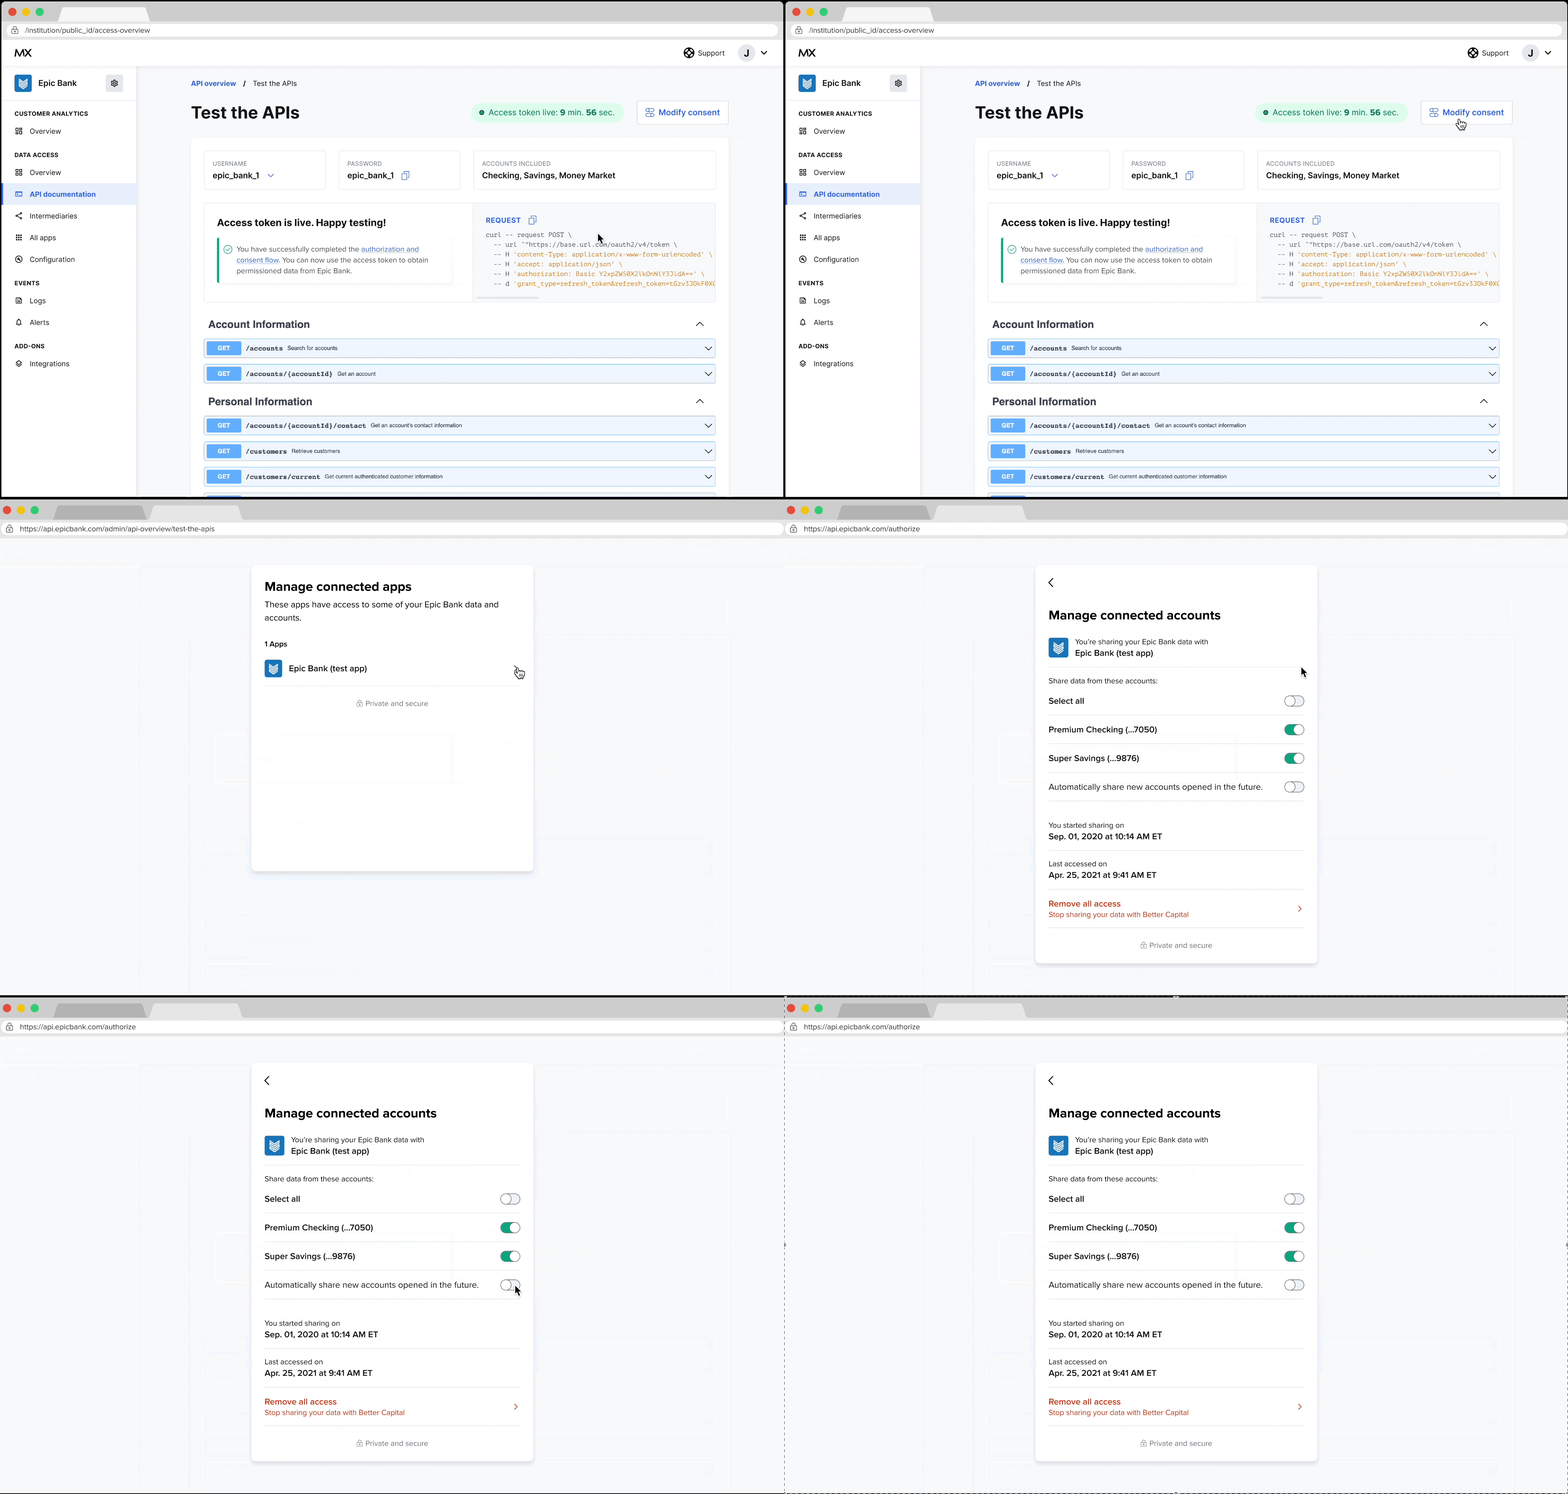 Modify the consent for Data Access to access your test user's individual accounts at any time using the following steps.
1. Select **Modify consent**. The consent management widget will launch in a new tab or window.
2. Select the app for which you want to modify consent. The testing app is called **Api Overview**.
3. Select the switch corresponding to the accounts you wish to grant consent for.
4. If desired, select the switch to **Automatically share new accounts opened in the future**.
5. If desired, you may remove the app's access to your test user's accounts by selecting **Remove all access** and then selecting **Confirm**.
6. Close the consent management widget's tab or window.
### Refresh Access Token
You may need to refresh your access token after it expires to continue testing. The testing page displays the time remaining on your access token on the top right.
To refresh your access token after it expires, select **Refresh token**.
### Re-Authenticate a Test User
Modify the consent for Data Access to access your test user's individual accounts at any time using the following steps.
1. Select **Modify consent**. The consent management widget will launch in a new tab or window.
2. Select the app for which you want to modify consent. The testing app is called **Api Overview**.
3. Select the switch corresponding to the accounts you wish to grant consent for.
4. If desired, select the switch to **Automatically share new accounts opened in the future**.
5. If desired, you may remove the app's access to your test user's accounts by selecting **Remove all access** and then selecting **Confirm**.
6. Close the consent management widget's tab or window.
### Refresh Access Token
You may need to refresh your access token after it expires to continue testing. The testing page displays the time remaining on your access token on the top right.
To refresh your access token after it expires, select **Refresh token**.
### Re-Authenticate a Test User
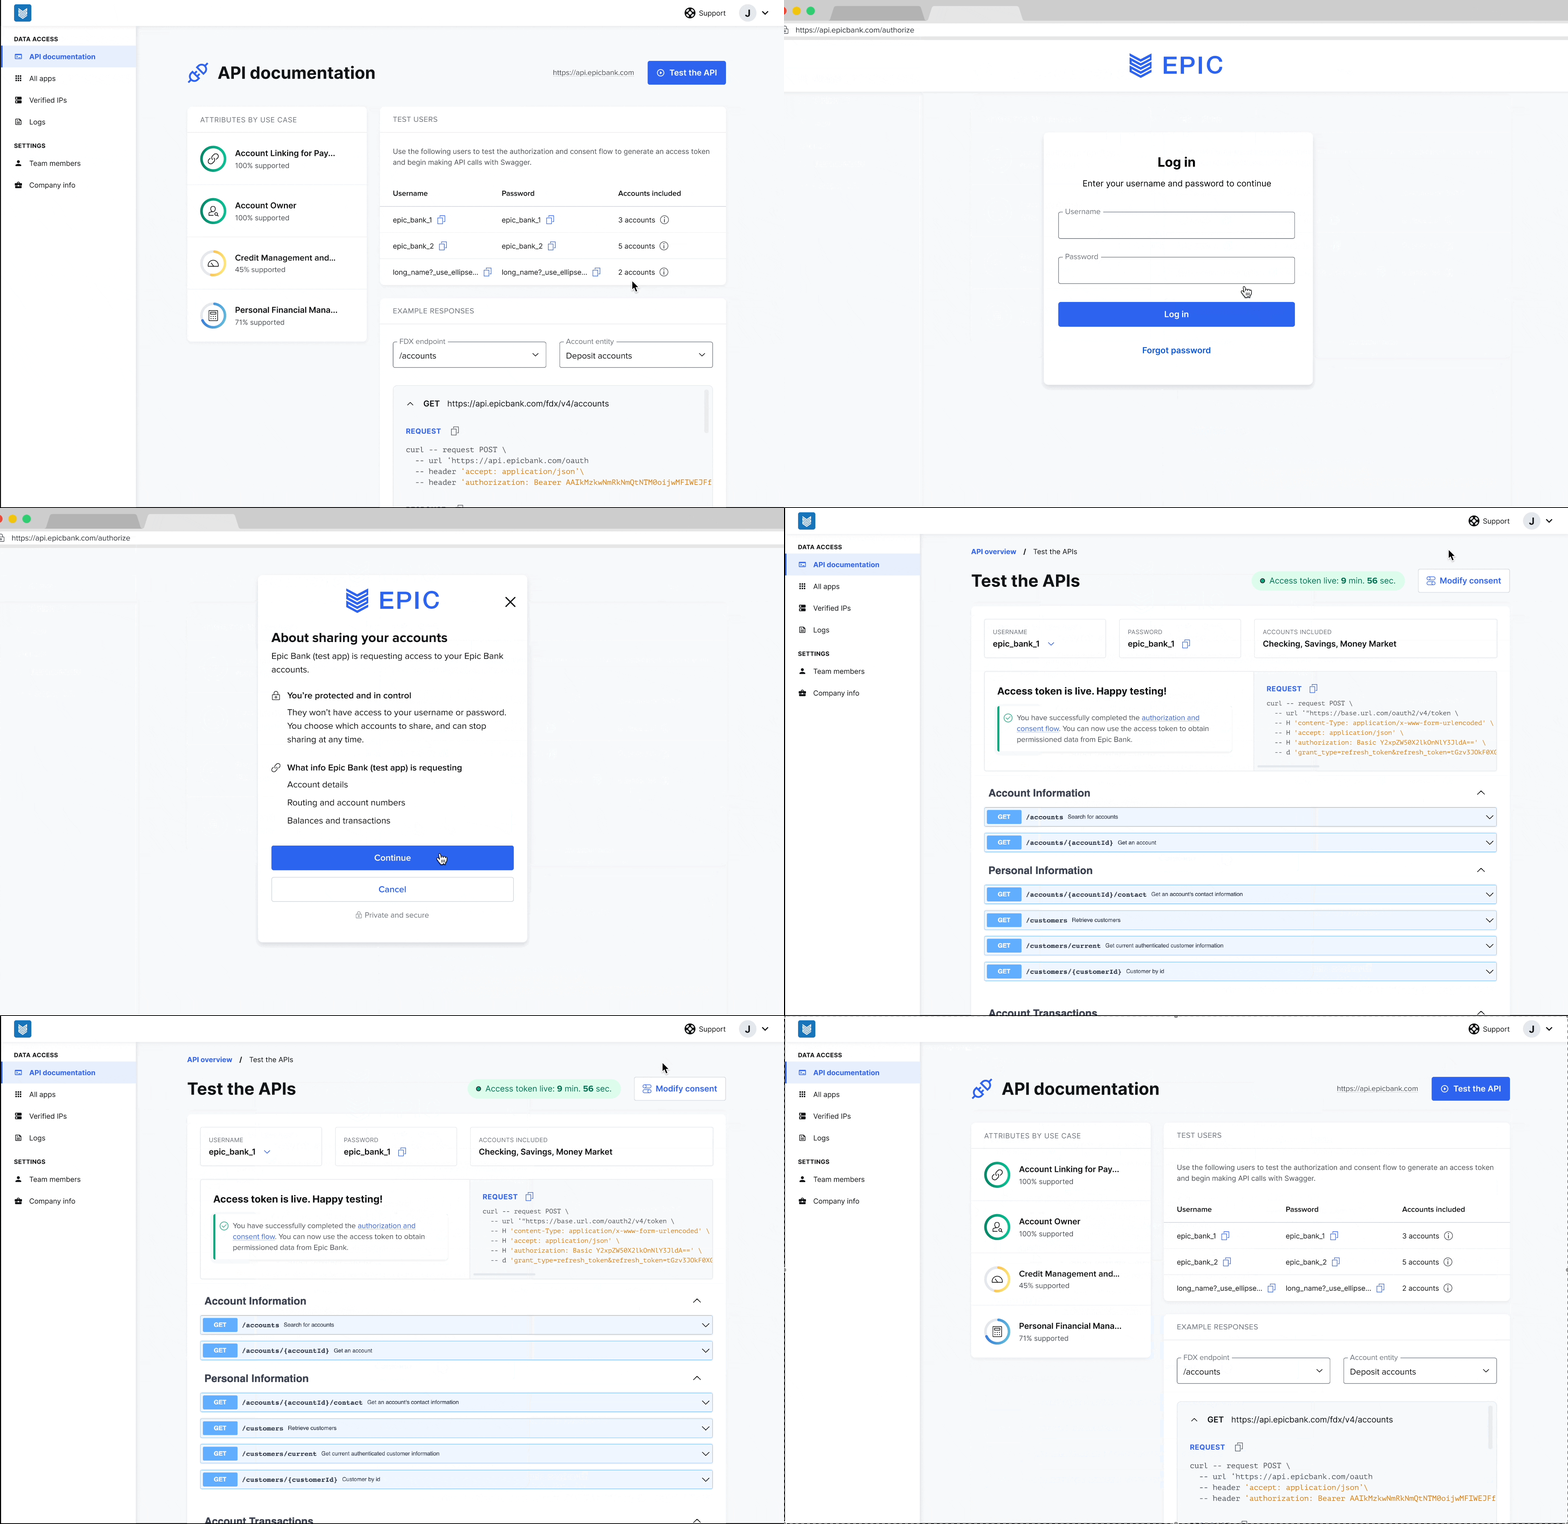 In certain situations, you may need to re-authenticate a test user. When this happens, you'll see that the access and refresh tokens are no longer valid on the top right of the testing page. Data Access also displays steps with instructions when re-authentication is necessary.
To re-authenticate a user:
1. Read the authentication steps presented to you.
2. Select **Re-authenticate test user**.
3. Authenticate with the username and password for the test user. You will be taken through the consent management flow for the test user.
4. Select **Continue**.
5. Check the **Select all accounts** box, then select **Continue**. You will see the **Review and share** modal.
6. Select **Confirm**.
In certain situations, you may need to re-authenticate a test user. When this happens, you'll see that the access and refresh tokens are no longer valid on the top right of the testing page. Data Access also displays steps with instructions when re-authentication is necessary.
To re-authenticate a user:
1. Read the authentication steps presented to you.
2. Select **Re-authenticate test user**.
3. Authenticate with the username and password for the test user. You will be taken through the consent management flow for the test user.
4. Select **Continue**.
5. Check the **Select all accounts** box, then select **Continue**. You will see the **Review and share** modal.
6. Select **Confirm**.